

Wondering what’s happening to the Facebook conversion pixel? How will advertisers track conversions after February 2017?
Read on….
Retiring the Conversion Pixel
As of February 15th, 2017, Facebook is disabling the conversion tracking pixel, at which point it’ll be removed from all advertising tools. So what should Facebook advertisers do next? In a word, you’ll need to upgrade to the new Facebook pixel.
There is a whole host of features the new Facebook pixel will give you. Here’s the list in comparison to the old features.
[caption id="attachment_8874" align="alignnone" width="500"]

Source: facebook.com[/caption]
The new Facebook pixel will allow you to track conversions in two ways—custom conversions and standard events. Let’s take a look at how to migrate over.
- 1. Create your Facebook pixel code and install on your website
- 2. Create your standard events
- 3. Use custom conversions
- 4. Update your existing ads and campaigns
1. Create your Facebook Pixel
Navigate to the Pixels section in your business manager account:
You’ll see the option to create a new pixel.
Install the pixel code on every page of your website. Validate your pixel implementation using the Facebook Pixel Helper,
available here.
2. Create Your Standard Events
Next, identify the standard events that are relevant to you, and then create them. There are nine options:
- Search
- View content
- Add to cart
- Add to wishlist
- Initiate checkout
- Add payment info
- Purchase
- Lead
- Complete registration
Navigate to the Pixels section in your business manager, and select the Facebook Pixel tab next to the old conversion tracking pixel.
This opens the following pop-up. Select Track Conversions With Standard Events. You can then choose from the nine standard events mentioned above. (Note: Choose this option for now; we’ll explain Custom Conversions in the next section.)
Choose the ones relevant to your business, and then have your web developer ad the code to your site on the pages you’d like to track.

Once the events are installed, use the pixel helper to confirm your tracking’s working correctly. If you see a green checkmark, then everything’s working as it should be.

3. When to Use Custom Conversions
If you’re using the same standard event to track multiple pages, you may want to consider using custom conversions to report separately on each event.
Navigate to the pixel dashboard, and this time, choose to track custom conversions.

Select Event from the rule drop-down, and then choose the event you want to track, along with the category.
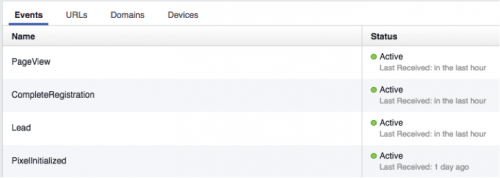
Once this is done and you refresh your dashboard, each event should have a green active status. You’ll now be able to add these individual events to your reporting dashboard and have individual metrics for each one.
4. Update Your Existing Campaigns
At this point, you’ll have the old and new pixels on your website. Once the new one’s working correctly, you’re ready to migrate over. Navigate to the campaigns you need to update, edit your ads to choose Track all conversions from my Facebook pixel, and save.

.webp)
